Melton Classics, Inc. MarbleTex™ Synthetic Marble Column Installation Instructions
1. Locate and mark the center point of the desired column location by using a plumb line.
2. Measure the opening from beam/soffit to floor at the previously marked location. If the column is too tall, shorten the column shaft using an abrasive type blade or diamond blade saw. CAUTION: Because the shaft is the load bearing member, the shaft’s top and bottom edges must achieve full, even contact with both load bearing surfaces. Use a rasp or sander to level as required. Top of column shaft must not be cut so that it falls below upper capital surface when capital is positioned on shaft.
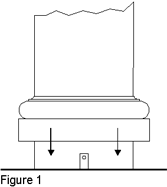
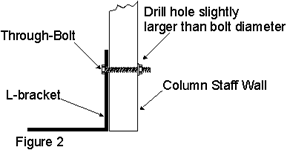
3. Assembly: If installation requires a method of securing column in place before load is applied, metal “L” brackets (suggested size 1 1/2″ x 1 1/2″) may be used as long as they do not interfere with the seating of the cap and the base/plinth. For this application, it may be necessary to split the capital into halves to allow for attachment of the angle brackets to the beam/soffit. NOTE: Always drill clearance holes in column shaft and secure angle brackets with through bolts. – DO NOT USE SCREWS – DO NOT OVER TIGHTEN. (See Figures 1 and 2 below.)
4. Slip base/plinth and capital onto column shaft from the top (end with the smallest diameter).
5. Apply high quality construction adhesive to top of capital and bottom of base/plinth.
6. Tip loosely assembled column into position and check level.
7. Align capital and base/plinth, and press into position. Wipe off any excess adhesive.
8. When additional attachment of the capital and base/plinth to the beam/soffit and floor is desired, pre-drill and countersink holes through the square members at the top and bottom of the column (abacus-top, plinth-bottom). Using non-corrosive fasteners, anchor the capital and base/plinth into the beam/soffit and floor. Fill countersunk fastener locations with caulk to obscure fastener locations.
9. Protect the column from damage during installation. Any stubborn stains or nicks can be repaired by hand sanding lightly with sandpaper.
Splitting Columns:
MarbleTexTM column shafts, capitals and base/plinths may be ordered in halves for pilasters, and for reassembly. They also may be cut in the field with an abrasive type or diamond saw blade.
Reassembly of Split Columns (Paint Grade Only):
1-R. Locate & mark the center point of the desired column location by dropping a plumb line from the beam/soffit to the deck. (OPTIONAL: Bolt metal angle brackets to column as above.)
2-R. Stand the first column half in the previously marked location ,and check level. (OPTIONAL: fasten metal angle brackets to beam/soffit and floor.)
3-R. Following adhesive manufacturers recommendations, secure the second column half under pressure to the first half using 3M-5200 adhesive. Remove the excess adhesive from seam, and allow to dry. Fasten metal angle brackets to beam/soffit and floor.
4-R. Align, and secure capital and base/plinth halves around column shaft under pressure using 3M-5200 adhesive. Cut off excess, and allow to dry.
To locate your local distributor for 3M-5200 Marine Polyester Sealant Adhesive #6500 White, call 1-800- 963-3060. Other high quality polyester adhesives may be substituted.